
Working With Plaster
If you haven’t yet, I would definitely check out Plaster. Plaster is a PowerShell scaffolding module. What that means for you is that its an easy way to keep your modules and functions consistent and following best practices. Its fully customizable and you can get started in just a few minutes.
The Good Stuff:
Go check out plaster, a template-based file and project generator written in PowerShell. Plaster Project Page
Installing
Plaster is completely open source and hosted on the PowerShell Team’s Github. We can grab the most recent version from the PowerShell gallery using the below command.
Install-Package -Name Plaster -Source PSGallery -Verbose -Force -ForceBootstrap
Exploring Commands
The first thing I do after installing a module is see what functions it has. Surprisingly, at the time of this writing, Plaster only has 4 commands.
C:\> Get-Command -Module Plaster

CommandType     Name                                               Version    Source
-----------     ----                                               -------    ------
Function        Get-PlasterTemplate                                1.0.1      plaster
Function        Invoke-Plaster                                     1.0.1      plaster
Function        New-PlasterManifest                                1.0.1      plaster
Function        Test-PlasterManifest                               1.0.1      plaster
The Default Plaster Template
Lets start with our only Get command in the module. Running this cmdlet on a fresh install, returns only the default Plaster Template.
PS C:\> Get-PlasterTemplate


Title        : New PowerShell Manifest Module
Author       : Plaster
Version      : 1.0.0
Description  : Creates files for a simple, non-shared PowerShell manifest module.
Tags         : {Module, ModuleManifest}
TemplatePath : C:\Program Files\WindowsPowerShell\Modules\plaster\1.0.1\Templates\NewPowerShellManifestModule
Lets try to use this template to create our fist module. We can start Plaster by running the Invoke-Plaster cmdlet with the path to our template and a destination.
$plasterDest = 'C:\temp'
$defaultTemplate = Get-PlasterTemplate |
    Where-Object -FilterScript {$PSItem.Title -eq 'New PowerShell Manifest Module'}

Invoke-Plaster -TemplatePath $defaultTemplate.TemplatePath -DestinationPath $plasterDest\MyFirstPlasterModule  -Verbose
Running the Invoke-Plaster cmdlet starts a wizard. By default you’re prompted for the module name, version, if you want to include pester tests (you know you should) and if you want a to include a VSCode folder.
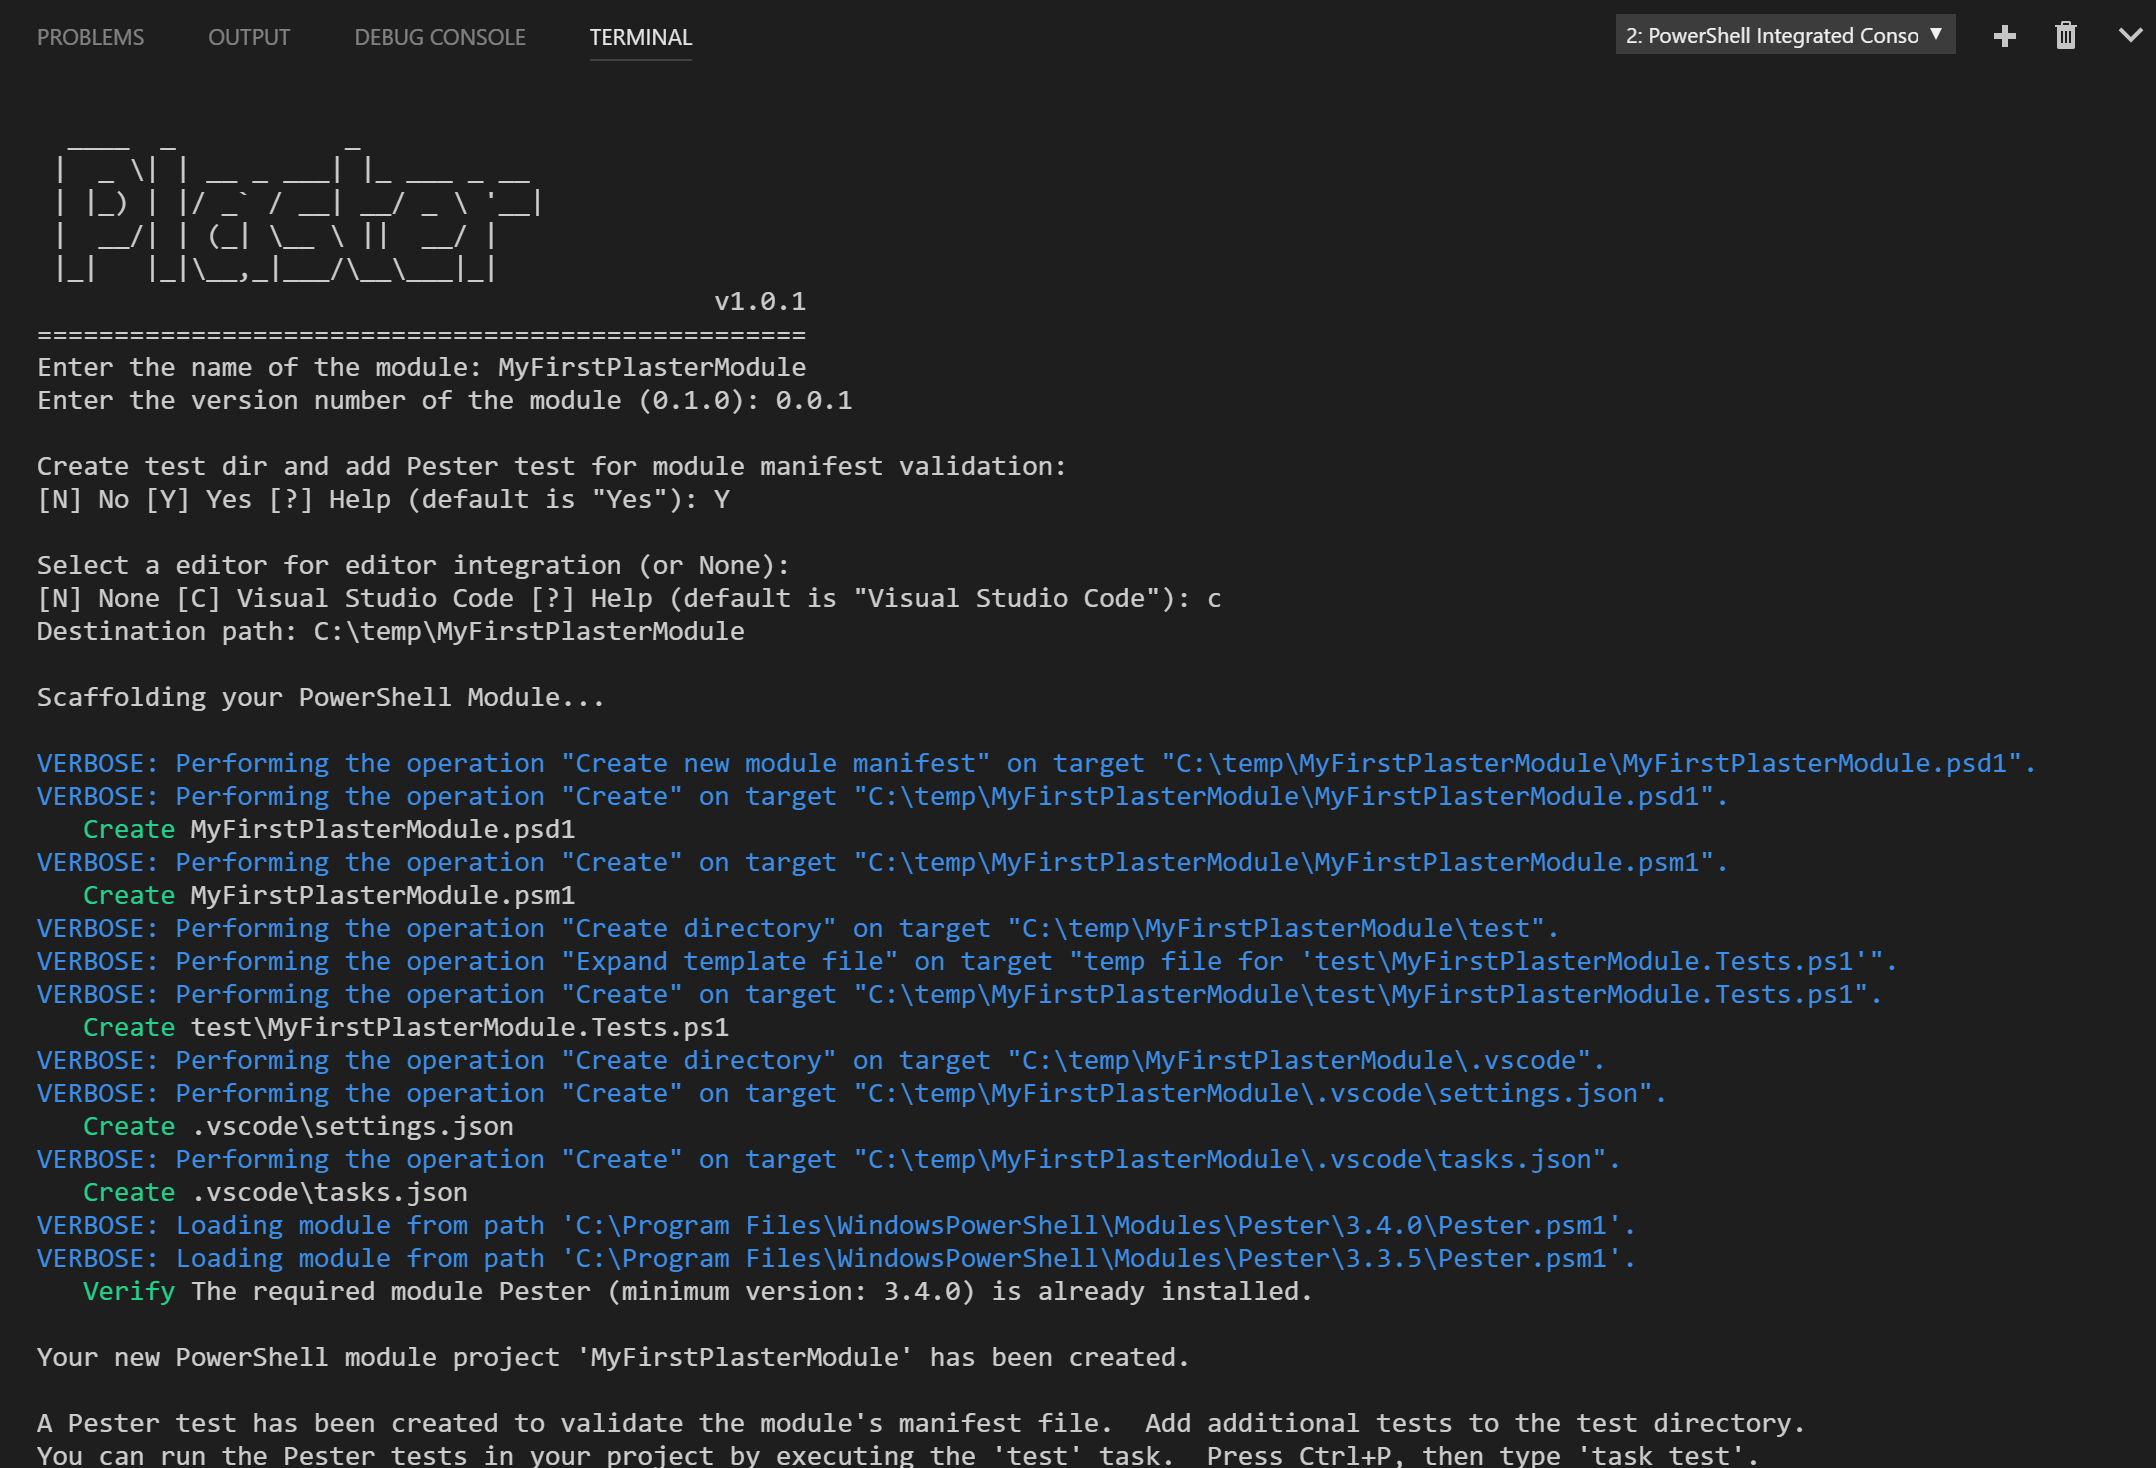
Here is the structure that Plaster created based on our answers.
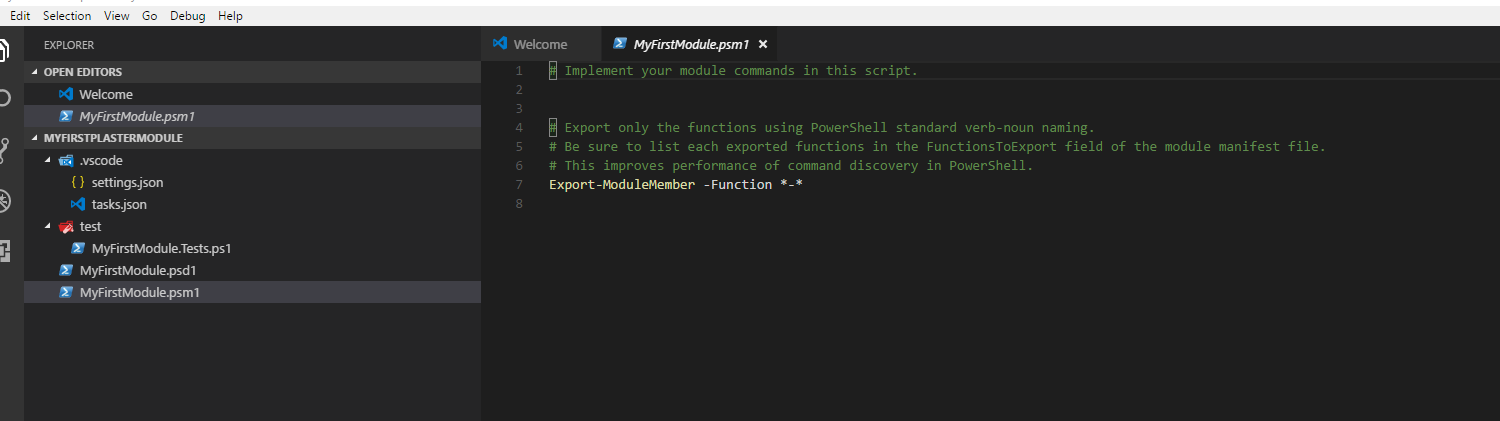
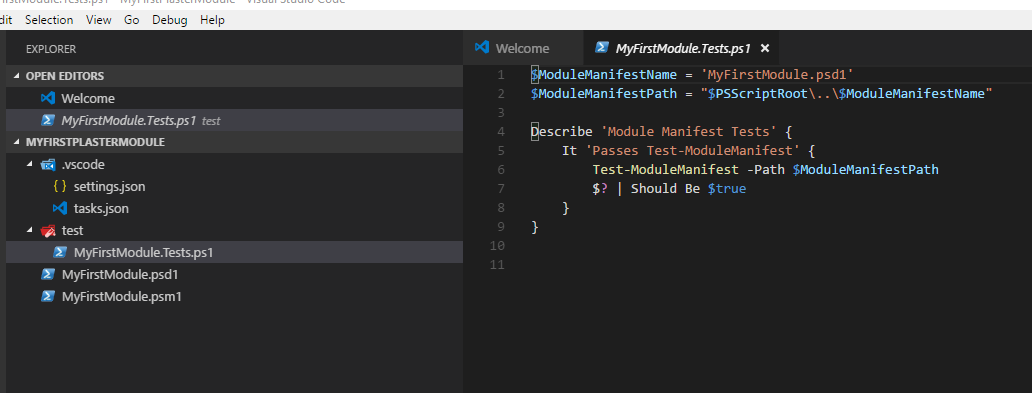
Since we chose to include pester tests, this test folder and and test.ps1 file were also created.
Creating our own Plaster templates
Ok thats not too bad, but this isn’t exactly what I use. How can we customize Plaster to get what we want? Lets take a look at New-PlasterManifest

Examining a manifest and its schema
Essentially a manifest can be broken into 3 parts.
- Metadata - This is information about the template
- Parameters - These will be presented as prompts to your users
- Content - What is actually going to be created using those parameters
Metadata
Metadata is information about the Plaster template itself.
We can create this section of the manifest by using the New-PlasterManifest cmdlet.
Lets go ahead and create our first manifest. One important thing to note is the path name must end in either PlasterManifest.xml or PlasterManifest_<culture-name>.xml.
$manifestProperties = @{
    Path = "C:\Temp\PlasterManifest.xml"
    Title = "DC Custom Plaster Template"
    TemplateName = 'MyCustomPlasterTemplate'
    TemplateVersion = '0.0.1'
    Author = 'David Christian'
}

New-PlasterManifest @manifestProperties
The cmdlet produced the below XML. Notice how the parameters and content sections are both empty.
PS C:\Temp> cat .\PlasterManifest.xml
<?xml version="1.0" encoding="utf-8"?>
<plasterManifest
  schemaVersion="1.0" xmlns="http://www.microsoft.com/schemas/PowerShell/Plaster/v1">
  <metadata>
    <name>MyCustomPlasterTemplate</name>
    <id>7ed96752-fc70-4346-8861-d2373d530181</id>
    <version>0.0.1</version>
    <title>DC Custom Plaster Template</title>
    <description></description>
    <author>David Christian</author>
    <tags></tags>
  </metadata>
  <parameters></parameters>
  <content></content>
</plasterManifest>
Parameters
Lets start looking at the parameter section. One parameters I’m going to need for sure is the module name. I want Plaster to prompt the user for this name and a brief description of the module. We’ll use this information later on in the manifest.
<parameter name="ModuleName" type="text" prompt="Name of your module" />
<parameter name="ModuleDesc" type="text" prompt="Brief description on this module" />
We can also create default values for our text parameters.
Here’s an example for the new modules’ version number.
Don’t worry about having to leave information about the default value, Plaster will automatically place it in parenthesis after your message.
<parameter name="ModuleVersion" type="text" prompt="Version number" default='0.0.0.1' />
There’s two other special data types.
We can use user-fullname and user-email.
What makes these special is they check the local machine’s Git config for values.
If it finds them, it will prompt with them as default.
<parameter name="ModuleAuthor" type="user-fullname" prompt="Author"/>
The next thing I wanted to do is create my folder structure for modules. When working with modules locally I like to keep all functions and classes in their own PS1 files. I also create a folder for binaries and data if needed. To get these options in Plaster, you can use the multichoice switch.
<parameter name="FunctionFolders" type="multichoice" prompt="Please select folders to include" default='0,1,2'>
<choice label="&Public" help="Adds a public folder to module root" value="Public" />
<choice label="&Internal" help="Adds a internal folder to module root" value="Internal" />
<choice label="&Classes" help="Adds a classes folder to module root" value="Classes" />
<choice label="&Binaries" help="Adds a binaries folder to module root" value="Binaries" />
<choice label="&Data" help="Adds a data folder to module root" value="Data" />
</parameter>
Finally I wanted the option to include pester tests. Notice the default of yes (hint hint).
<parameter name="Pester" type="choice" prompt="Include Pester Tests?" default='0'>
<choice label="&Yes" help="Adds a pester folder" value="Yes" />
<choice label="&No" help="Does not add a pester folder" value="No" />
</parameter>
Content
The final section is the content section. Content tells Plaster what actions to take based on our parameters.
First thing we needed to do was create our PSM1 and PSD1. For the PSD1, I’m using the built in Plaster command of newModuleManifest. For the PSM1, I have a generic template that i use to load up my functions and classes.
<newModuleManifest destination='${PLASTER_PARAM_ModuleName}.psd1'
        moduleVersion='$PLASTER_PARAM_ModuleVersion'
        rootModule='${PLASTER_PARAM_ModuleName}.psm1'
        author='$PLASTER_PARAM_ModuleAuthor'
        description='$PLASTER_PARAM_ModuleDesc'/>
<file source='template.psm1' destination='${PLASTER_PARAM_ModuleName}.psm1'/>
This is what the generic PSM1 file looks like. This template is stored with my Plaster manifest.
$functionFolders = @('Public', 'Internal', 'Classes')
ForEach ($folder in $functionFolders)
{
    $folderPath = Join-Path -Path $PSScriptRoot -ChildPath $folder
    If (Test-Path -Path $folderPath)
    {
        Write-Verbose -Message "Importing from $folder"
        $functions = Get-ChildItem -Path $folderPath -Filter '*.ps1'
        ForEach ($function in $functions)
        {
            Write-Verbose -Message "  Importing $($function.BaseName)"
            . $($function.FullName)
        }
    }
}
$publicFunctions = (Get-ChildItem -Path "$PSScriptRoot\Public" -Filter '*.ps1').BaseName
Export-ModuleMember -Function $publicFunctions
Next we need to create the folders the user selected. I first start by displaying a message to the user telling them what step we are on. Plaster has an optional property called condition. Condition is just a scriptblock. If the scriptblock evaluates to $true, the action will be taken. What’s really cool is Plaster will auto create the variables for you. Any variable from a parameter can be referenced via $PLASTER_PARAM_YourVariableNameHere. In the below example, I check if the $PLASTER_PARAM_FunctionFolders variable has an entry for the folder. If it does, it gets created.
<message> Creating you folders for module: $PLASTER_PARAM_ModuleName </message>
<file condition='$PLASTER_PARAM_FunctionFolders -contains "Public"' destination='Public\' source='' />
<file condition='$PLASTER_PARAM_FunctionFolders -contains "Internal"' destination='Internal\' source='' />
<file condition='$PLASTER_PARAM_FunctionFolders -contains "Classes"' destination='Classes\' source='' />
<file condition='$PLASTER_PARAM_FunctionFolders -contains "Binaries"' destination='Binaries\' source='' />
<file condition='$PLASTER_PARAM_FunctionFolders -contains "Data"' destination='Data\' source='' />
If the user selected Pester tests, I wanted to create that folder, as well as include a basic Pester test file for their module.
<message condition='$PLASTER_PARAM_Pester -eq "Yes"'>Creating a Tests folder </message>
<file condition='$PLASTER_PARAM_Pester -eq "Yes"' destination='Tests\' source='' />
<file condition='$PLASTER_PARAM_Pester -eq "Yes"' destination='Tests\${PLASTER_PARAM_ModuleName}.tests.ps1' source='basicTest.ps1' />
Here’s my basic test file. It was shamelessly stolen from Kevin Marquette’s blog. He did an amazing write up on creating a CI/CD pipeline that included this file. Its main purpose is to validate the all PowerShell files in the module are syntactically correct (can be parsed via the AST) and the module can be imported.
$moduleRoot = Resolve-Path "$PSScriptRoot\.."
$moduleName = Split-Path $moduleRoot -Leaf

Describe "General project validation: $moduleName" {

    $scripts = Get-ChildItem $moduleRoot -Include *.ps1, *.psm1, *.psd1 -Recurse

    # TestCases are splatted to the script so we need hashtables
    $testCase = $scripts | Foreach-Object {@{file = $_}}
    It "Script <file> should be valid powershell" -TestCases $testCase {
        param($file)

        $file.fullname | Should Exist

        $contents = Get-Content -Path $file.fullname -ErrorAction Stop
        $errors = $null
        $null = [System.Management.Automation.PSParser]::Tokenize($contents, [ref]$errors)
        $errors.Count | Should Be 0
    }

    It "Module '$moduleName' can import cleanly" {
        {Import-Module (Join-Path $moduleRoot "$moduleName.psm1") -force } | Should Not Throw
    }
}
OK, moment of truth. With our new manifest and template files in place, it’s time to run our manifest.
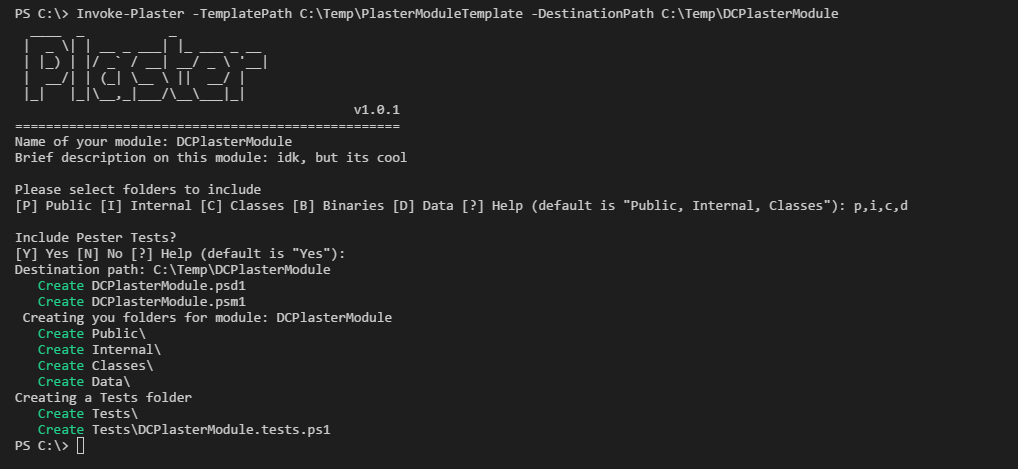
Sure enough it worked! Plaster took all of our parameters and created the below structure.
PS C:\Temp\DCPlasterModule> ls


    Directory: C:\Temp\DCPlasterModule


Mode                LastWriteTime         Length Name
----                -------------         ------ ----
d-----        4/20/2017   7:21 PM                Classes
d-----        4/20/2017   7:21 PM                Data
d-----        4/20/2017   7:21 PM                Internal
d-----        4/20/2017   7:21 PM                Public
d-----        4/20/2017   7:21 PM                Tests
-a----        4/20/2017   7:21 PM           3906 DCPlasterModule.psd1
-a----        4/19/2017   7:12 PM            662 DCPlasterModule.psm1


PS C:\Temp\DCPlasterModule>
Using Token Replacement
Another very powerful feature of Plaster is its ability to use Template files and token replacement. To showcase these features i wanted to create another manifest. This time, I wanted to have a flexible function template that i could use to get started.
I’m going to skip the Metadata and Parameter section since nothing new is happening here. Instead focus on this new command TemplateFile.
<content>
    <templateFile source='functionTemplate.ps1' destination='${PLASTER_PARAM_FunctionName}.ps1'/>
    <templateFile source='testsTemplate.ps1' destination='${PLASTER_PARAM_FunctionName}.tests.ps1'/>
</content>
A template file uses a combination of script blocks and token replacement. Scriptblocks in templates need to begin and end with <% and %> respectively. Its also important to note that these delimiters need to be the first characters on the line.
What’s neat is that you can include all the PowerShell logic you’re use to inside these script blocks. Also remember you’ll have full access to your Plaster Parameters. In the below example, I check if the user selected cmdlet based help. If they did, I’ll inject this help snippet into the final file.
<%
    If ($PLASTER_PARAM_Help -eq 'Yes')
    {
        @"
  <#
    .Synopsis
      Short description
    .DESCRIPTION
      Long description
    .EXAMPLE
      Example of how to use this cmdlet
  #>
"@
    }
%>
Here’s another example of where we’re we can change behavior depending on what the user selected.
<%
    if ($PLASTER_PARAM_CmdletBinding -eq 'Simple')
    {
        @"
    [CmdletBinding()]
"@
    }
    else
    {
        @'
    [CmdletBinding(DefaultParameterSetName='Parameter Set 1',
                SupportsShouldProcess=$true,
                PositionalBinding=$false,
                HelpUri = 'http://www.microsoft.com/',
                ConfirmImpact='Medium')]
'@
    }
%>
To make things easier, I recommend creating a folder for each manifest you have. Here’s what my final folder structure looks like.
C:.
├───Function
│       functionTemplate.ps1
│       PlasterManifest.xml
│       testsTemplate.ps1
│
└───Module
        basicTest.ps1
        PlasterManifest.xml
        template.psm1
Wrapping up
Plaster is a fully customizable, incredibly powerful PowerShell scaffolding module. With a little bit of time and your existing PowerShell knowledge you can create clean templates to get new projects up and running quickly. For the completed module template covered in this article go Here. The complete function template can be found Here. Most importantly remember to go check out the Plaster Project for more information and full documentation.